Keep Track of Your Code Files With Git
TIME LIMIT: 3 HOURS
In this chapter, we introduce you to git, a piece of software that helps you keep track of your code files. Git essentially takes snapshots of your code whenever you tell it to. Each snapshot is called a commit. Unless and until you delete a commit, you can always return to it. This is incredibly important, as it allows programmers to code without fear of destroying their previous work.
But what happens if your computer breaks or is stolen? A prudent programmer also keeps copies of their commits on an external server (i.e. a computer that isn’t your own) somewhere. And so we will now also introduce you to GitHub. GitHub is a software company whose primary service is to provide hosting for source code.
Buckle up. We are about to launch your coding portfolio.

The Boss is Back
You’ve just finished coding out the index.html page from the previous chapter. The Boss comes back in. They have some feedback for you!
You: Here’s the page, Boss.
You show The Boss the webpage on your monitor.
The Boss: This looks great! Definitely up to spec. Our “Hello There” product really seems to be coming along.
You: Thanks. Happy to make any future changes.
The Boss: We will get to changes tomorrow. However, our Chief Technology Officer wants to review your code… but she is working from another city right now.
You: No problem. I will send her a link to a GitHub repository in 5 minutes. If you want, you will also be able to see it at https://github.com/zero-to-code/hello-there.
…
The rest of this chapter helps you figure out how to create such a repository on your own GitHub account. The link will be the same, except you have to replace the “zero-to-code” portion of it with your own GitHub username.
Version Control
Before we dive deeper into git and GitHub, let’s talk a little bit more about why we need these technologies.
Coders need to track different versions of their code. They need to be able to make changes without losing previous versions of their work. Coders need to be able to experiment without fear of crashing their webpage.
Enter version control.
Version control is the generic name for any process that programmers use to save and manage different copies (versions) of their source code. Version control is what a programmer uses to save their work before they make changes. The Boss said we would be making changes to index.html (in the next chapter), so we may as well go ahead and begin tracking the first version of that file.
There are many different types of version control in the world. The most popular one for coders is git. Git will be an essential part of our workflow for the rest of this book.
Git Terminology
Familiarity with the following git terms will facilitate the discussion.
-
commit - A snapshot of your source code files as they exist at a particular moment. You control which files go into each commit.
-
repository - The directory that contains all of your source code files. Your codebase must be in a directory in order to track it with git (which is why we move
index.htmlinto a new directory in Step 2 below). A repository includes a record of all of your commits in a special hidden sub-directory located at.git. Repositories are also often called repos. -
remote repository - A repository that is not on your local computer. Remote repositories are powerful, as they allow you create backups of your code somewhere besides your computer. Remote repositories are also useful when working with other coders.
-
distributed - Because of remote repositories, if any one computer fails, the code is still safe on another computer. This quality - where the codebase is mirrored on different computers - makes git a distributed system.
Using GitHub To Host Remote Repositories
At its core, GitHub is a web service that sells hosting for remote repositories. GitHub hosts open-source repositories for free, which has made it the worldwide platform of choice for open-source software. Most software companies also make heavy use of GitHub. GitHub offers several other products (the Gist note-taking service, GitHub Pages web hosting, the Atom code editor), but their core business is hosting source code.
The rest of this chapter walks you through creating your first git repository and mirroring it to a GitHub remote repository.
1. Git Up and Go.
Download git onto your computer: https://git-scm.com/downloads
Join GitHub.com if you haven’t already.
2. Put index.html into a folder
Assuming that you have the index.html file from the previous chapter on your Desktop, enter the following commands into Terminal to create a directory called hello-there and move index.html inside of it:
cd ~/Desktop
mkdir hello-there
mv index.html hello-there
cd hello-there
ls

3. Initialize a git repository in the hello-there folder
From inside the hello-there directory, run the following command:
git init
If you have successfully installed git on your system, then you should see a message telling you that a git repository has been initialized. Run the following command
ls -lah
You should see a folder called .git.

4. Create your first git commit
Continuing in the Terminal, it is time to take our first snapshot!
git status
git add index.html
git commit -m "First set of hello world mockups."
git status
git log

git log should show you one commit. But this code is still sandboxed on our computer, and we want to share it with our CTO. Time to take advantage of git’s distributed nature. We are going to put a copy of our code on GitHub.com
5. Create a remote repository on GitHub.com
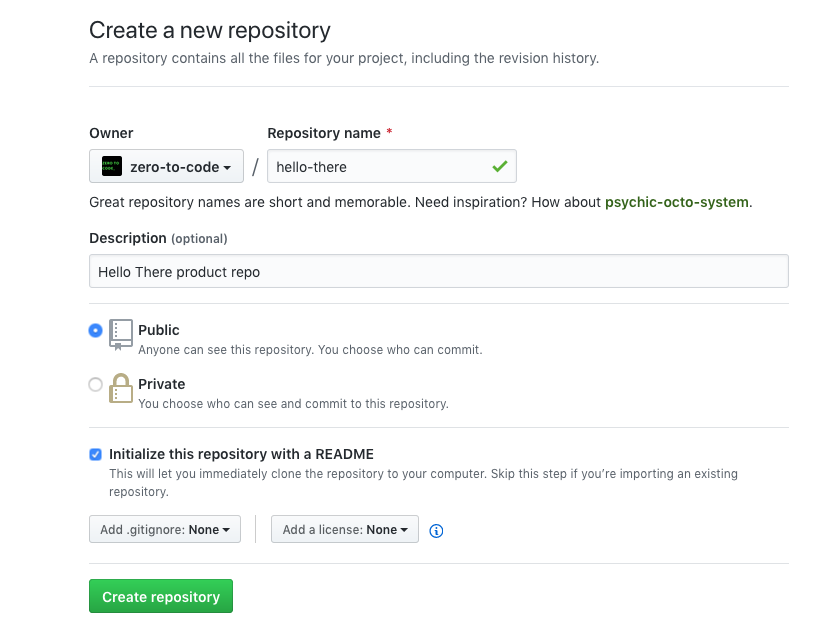
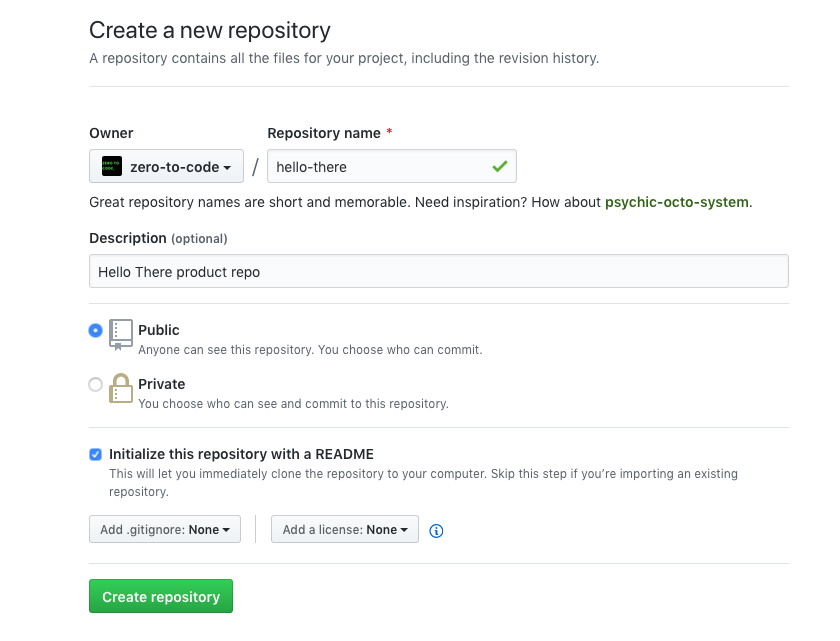
Now it’s time to tell GitHub that you want a repository called hello-there. Log in to your GitHub account, click the plus icon at the top, and select “New Repository”.

Now you can fill out the initial settings. Since The Boss said the product was going to be called “Hello There”, I have named the repo hello-there.

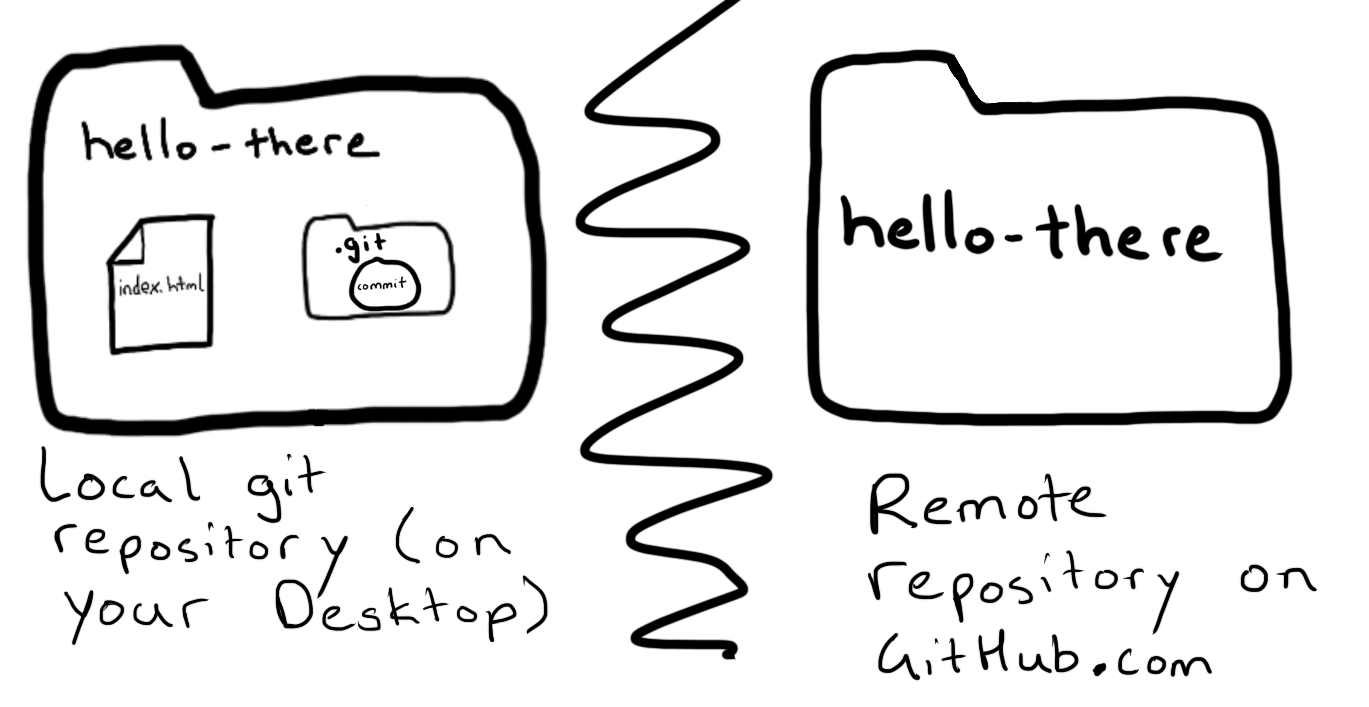
Voilá! You now have 2 repositories - one on your local computer and one on GitHub.com. They aren’t connected yet, though.

6. Connect Your Local Git Repository To The GitHub.com Remote Repository
Copy the URL of your GitHub.com repository. It should take the format of https://github.com/<YOUR GITHUB USERNAME>/hello-there.
Again, from the Terminal:
cd ~/Desktop/hello-there
git remote -v
git remote add origin https://github.com/<YOUR GITHUB USERNAME>/hello-there
git remote -v
This says “Hey git, connect this repository to a remote repository at https://github.com/

### 7. Push your commits to GitHub.com
From the command line, from the hello-there “repo”:
git push origin master
This command says “Hey git, push the ‘master’ branch of code called to the origin repository.” (we will cover branches in the next chapter)

You should now be able to go to https://github.com/<YOUR GITHUB USERNAME>/hello-there and see your code on GitHub.
In the next section, we’re going to take advantage of GitHub Pages to deploy our page to the world wide web!
Pro-Tip: Build Your Github With Your Own Additional Projects
From now on, you should push ALL coding projects to a new repository on GitHub. Every random tutorial you do, every little idea you work on - version control it and push it to a repo. This builds your resume.
It also builds your git skills. All professional work should be version controlled. Don’t be surprised if you are asked about version control in a job interview.
Exercises:
-
It is a good use of your time to do a few git/GitHub tutorials in the beginning - git has become a ubiquitous technology. One official GitHub tutorial is here: https://guides.github.com/activities/hello-world/
-
Here is another official GitHub tutorial: https://try.github.io. I made flash cards from this tutorial when I started out.
- Go explore GitHub for 10 minutes:
- Star some repos (figure out what it means to “star a repo”).
- Follow people - my account is at https://github.com/kevmo.
- Go explore the Zero To Code organization page: https://github.com/zero-to-code
- Create an empty repository with a README.md document in it (as we did above).
-
Go look at the table of contents of the ** Pro Git** book, written by one of the GitHub cofounders. https://git-scm.com/book/en/v2. Read/skim the first two chapters. This is a reference manual that you should bookmark - it is on the list in Appendix A: A Hacker’s Bookshelf.
-
Look up any commands you didn’t understand in this chapter.
-
Read more about the differences between git and GitHub - Stack Overflow answer.
- Speaking of Stack Overflow, are you using it? Stack Overflow is an essential resource. Make sure you are logging into your user account and participating a bit.
