Manipulating Webpages: The Document Object Model and Other Browser APIs
TIME LIMIT: 4 HOURS
Webpage APIs
It’s time to start building webpages with JavaScript. In this chapter, we will manipulate webpages using Web APIs.
Web APIs are code that browser vendors (i.e. Google, Mozilla, Apple, Microsoft) build into their JavaScript implementations. Web APIs are not part of the formal JavaScript language – they are just APIs that have been integrated into the JavaScript browser environment. There are many Web APIs.
The Document Object Model, aka the “DOM”, is the most important Web API. The DOM is the browser’s programmatic representation of and interface for HTML elements. Other important Web APIs include Fetch, which makes HTTP requests, and Web Storage, which stores user information between browser sessions. We explore these three Web APIs in this chapter.
In the last chapter, we got hired as a “software engineer who focuses on front-end” at CityBucket. In this chapter, we receive our first front-end assignment. We will build several webpages that make heavy use of Web APIs.

The DOM In A Nutshell
Before we ramble on & write a bunch of code that uses the Document Object Model, let’s talk briefly about what the hell it is. Like much of the web, the DOM has a long history of conflicting standards. We are going to ignore those. For our purposes, the DOM is two things.
1. The DOM is a data structure that contains all of the information about about a webpages HTML elements.
The DOM is a tree data structure. This is easy to explain visually.
Examine the following HTML. Pay special attention to how elements are nested inside one another.
<!doctype html>
<html>
  <head>
    <meta charset="utf-8">
    <link rel="stylesheet" href="/styles.css">
    <title>CityBucket</title>
  </head>
  <body>
    <h1>CityBucket</h1>
    <div class="Main">
      <p>Hello</p>
      <p>There</p>
    </div>
    <script>
        console.log("Hello");
    </script>
  </body>
</html>
The browser engine organizes these HTML elements into a tree data structure. It looks like this:

Each individual element is called a node. The node at the very top of the whole structure (the html node) is the root node. All non-root nodes have a parent node. Parent nodes have references to their children nodes.
Each node object includes all of the relevant information about the HTML element it represents.
2. The DOM comes with an API for creating, reading, updating, and deleting HTML elements.
The DOM is also an API with many methods for manipulating DOM nodes on a webpage. It is encapsulated as the document object that is globally available in your browser. Open up the JavaScript console on your favorite webpage and type the following, one line at a time. Examine the effects each has upon the webpage.
console.log(typeof document);

document.body.innerHTML = "overwritten";

const paragraph = document.createElement("p");

const bookText = document.createTextNode("Silent Spring");

paragraph.appendChild(bookText);

document.body.appendChild(paragraph);

document.body.removeChild(paragraph);
You can use document.createElement to create elements. You can create bindings to DOM nodes that have id attributes with document.getElementById. You can then append newly creating HTML elements by calling that binding’s appendChild method. Remove it with the removeChild method.
You can probably begin to imagine how all of this is useful, particularly when you are working with “live” data.
There are many other methods on the document object. You can see them by running console.dir(document). Since extracting data from users is one of the primary reasons businesses run webpages, the document.forms API is especially worth exploring.
Other Web APIs
Fetch
Browsers have added more and more functionality to the DOM API over the years, particularly with the advent of the HTML5 standard. In this chapter, we will use the fetch API to make HTTP requests that allow us to import JSON data without refreshing a webpage. The code looks like this.
fetch("/data/water.json")
  .then(function(httpResponse) {
    return httpResponse.json();
  })
  .then(function(jsonData) {
    // create and attach DOM elements with the data
  })
This code uses a pattern called method chaining to pipe the data out of the HTTP response and then convert it to a usable JavaScript object from which data can be extracted an Added to the DOM.
Web Storage
We will use the browser’s built-in storage – localStorage can persist user information between different browser sessions, even if the user completely exits the browser. It’s as simple as this:
localStorage.setItem("\_cb_user", "Kevin Moore");
localStorage.getItem("\_cb_user");  // returns "Kevin Moore"
Underscores at the beginning of key names (like in “_cb_user”) are used as an informal notation to be careful about editing whatever value that key points to.
Let’s put these Web APIs to work!
Your First Assignment at CityBucket
Scenario: It’s your second day at CityBucket (you spent the first filling out forms). The CEO of CityBucket and the Engineering Team lead come in. Both are younger than The Boss and Team Lead were at your previous company.
CEO: Hey, how’s it going, great to see you again.
You: Hey CEO, hey Team Lead. It’s going good. Spent most of yesterday filling out forms and going to new employee meetings. I appreciate that y’all have a code of conduct and employee handbook. Ready to write some code!
CEO: Great. So here’s the deal. You’re our fourth engineer. We also have Backend Engineer, Mobile App Engineer 1, and Mobile App Engineer 2. Actually, you’re our fifth engineer. Team Lead is halfway an engineer.
Team Lead: Mostly backend. I focus on DevOps and make sure everyone is doing stuff that is compatible with one another. Since we have 2 mobile apps and are now adding a web app… it’s important to make sure the backend and database are solid for the three client apps.

CEO: Exactly. And we hired you to build this new client application.
Team Lead: Well, we hired you primarily to build the new web client app. You will probably dip into the backend at some point (I hope). It’s also in JavaScript – we use the Express.js framework. Anyways.
You: feeling kind of overwhelmed Yeah! Can’t wait to do some backend work…
Team Lead: Today’s task is starting our front-end client application repo, however. I want you to create a GitHub repository (on our team account) called cb-client-web.
Team Lead: Then I want you to use HTML, CSS, JavaScript, and JSON files to build the following pages. Use only native DOM methods. Don’t use any libraries like jQuery or React. We want three pages - a Sign Up page, a Profile page, and a Water Sources dashboard. Let’s go through all three and talk about which DOM APIs to use.

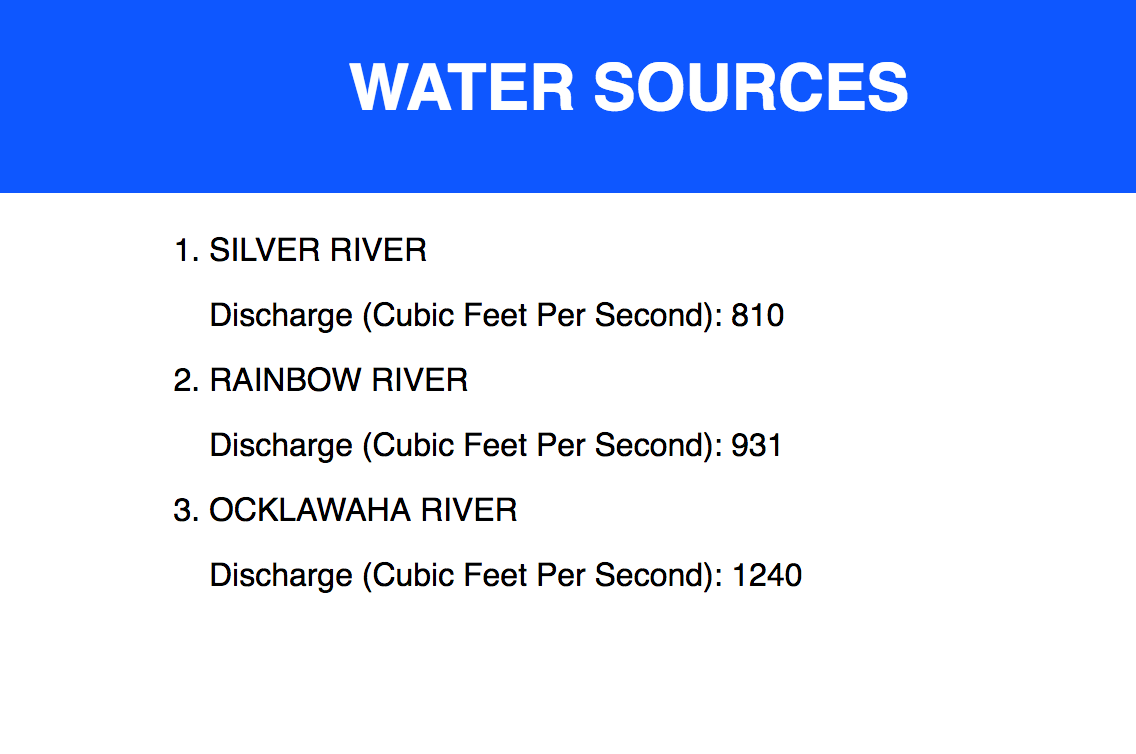
Team Lead: This is Water Sources page. This page is just a list of water sources in a city - it will be different for every city. We want you to build a mock of this with some fake data. This should be done in three different files, water.html, water.json, and water.js.
Store your mock data in water.json. We want to separate the data from the UI code. Since the data will be different for every city.
Retrieve that data in water.js – use the DOM Fetch API, it will make an HTTP request for the JSON for you. Once you’ve got the data, you can use the regular DOM API to create elements containing the data, then attach those elements to the page.
Does this make sense?
You: Here’s my plan for the Water Sources page in our frontend application:
- Create
water.htmlas a webpage with an empty ordered list element in it. Give thatolelement anidof “WaterSources”. We use an ID instead of a class because IDs are unique values, which is helpful when you’re selecting specific elements in JavaScript. - Create
water.jsonas a JSON array with water source data objects in it. Give each “Source” object two keys -nameanddischarge. To start, we create an array with three members. - In
water.js, write JavaScript that uses the DOM API to connect the JSON data with the HTML user interface: First, Fetch thewater.jsondata resource. Second, parse that data and attach it to DOM list item elements that we will create. Third, attach thoselielements to the ordered list inwater.htmlviaappendChildDOM functions.
Team Lead: Perfect. The Fetch API can be a little confusing at first. It’s a relatively new API and uses ES 6 promises… but if you just copy some of the code on MDN, you should be able to figure it out…
You: you wonder what the fuck an ES 6 promise is Make it work first, then try to understand it?
CEO: Exactly.

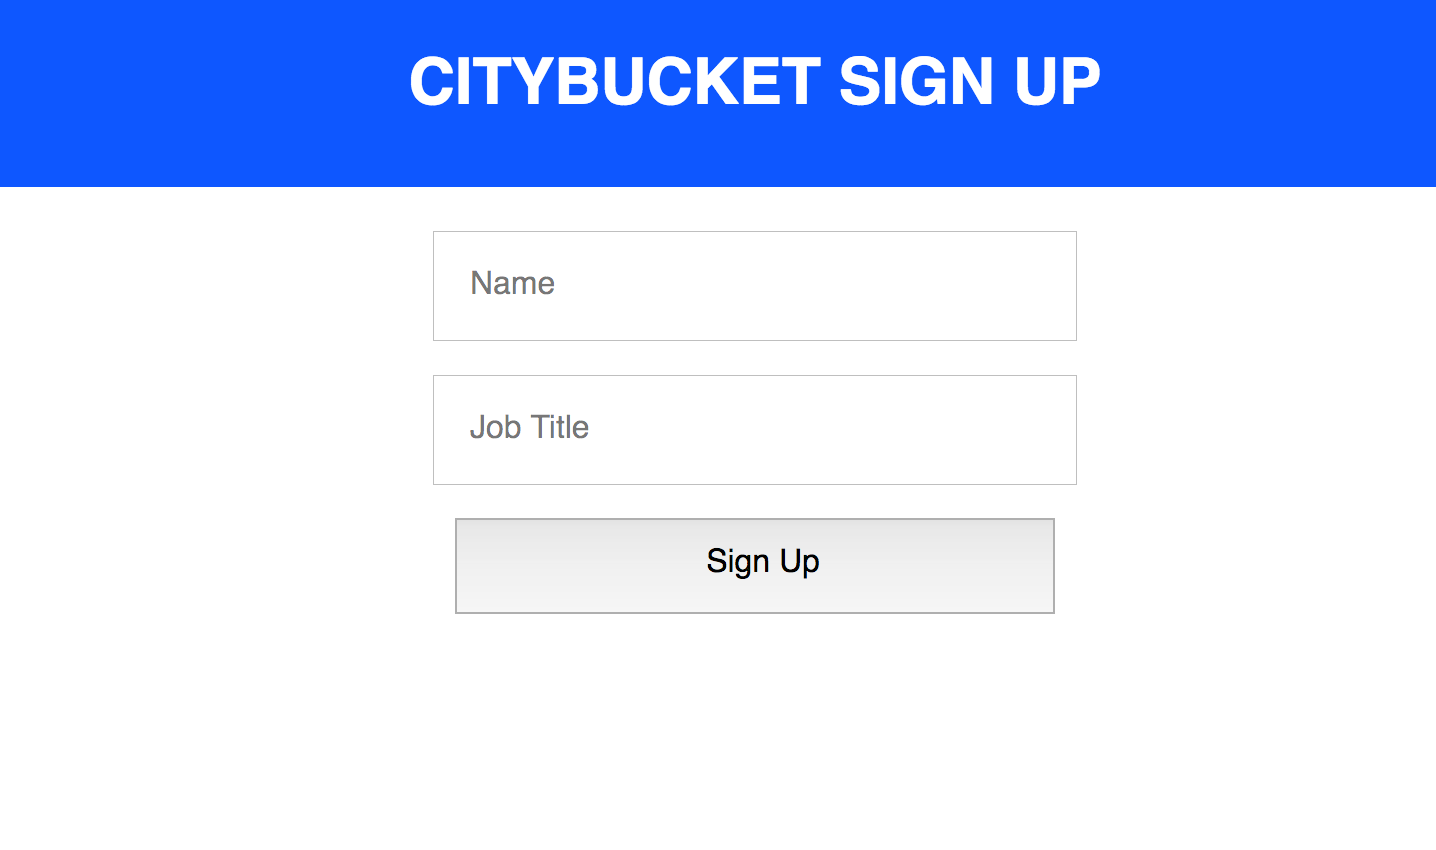
Team Lead: Here is the Sign Up page. It’s pretty scarce right now, we will add more fields to the user model later. It’s a standard form with two input fields and a button. I want to store the data the user submits in the DOM’s localStorage. localStorage is just a key-value store. So your process is: listen for the form’s submission event, grab the user data with the document.forms API, then turn the user info into a stringified JSON object (localStorage will only store strings), and cram that value into localStorage. I recommend using _cb_user as the key. Does that make sense?
You: Here’s my plan:
- Create
signup.html. In the HTML, include a form element that has anameattribute of “SignUp”. - In the linked
signup.jsfile, write code to save a user’s data in the browser’s localStorage:
First, create a listener for the form’s “submission” event.
Second, have that event trigger a function that extract’s the user’s input from the form.
Third, serialize that user input in a format that can be stored in the browser’s localStorage.
Fourth, save that input with the key _cb_user.
Team Lead: Good. Also, once they submit, redirect the page to the Profile Page.

Team Lead: This is the Profile page. It shouldn’t take much code, so you can just put everything in a profile.html file for now. In some <script></script> tags, write JavaScript that retrieves the _cb_user value from localStorage, deserializes the data into a JavaScript object, and then use DOM methods to update the name and job title elements. Does that make sense?
You: Here’s my plan:
- Create a
profile.htmlpage. This page’sbodywill have three essential HTML elements: Anh2element with anidattribute of “ProfileName”, apelement with anidattribute of “Profession”, and ascripttag. - Inside the script tags, we will extract the
_cb_userdata from the browser’slocalStorage. After converting the localStorage string back into a JS object, we will use the data to set theinnerHTMLvalues of of the H2 and P tags.
Team Lead: That’s exactly right. Here is the directory structure I think you should use. gets up and walks to the whiteboard

Team Lead: Does this make sense?
You: Yes. We are mostly dividing up the individual code files by whatever top-level part of the system they belong to. The signup and profile files go into a users folder because they are all about user-specific functionality. We have a water folder for UI + code that has to do with water sources. index.css sits outside of these because it’s common across all of our views (HTML files).
Team Lead: Yes, excellent.
You: Do you want me to deploy this?
Team Lead: No. Today, I just want to be able to run this locally using a Python HTTP server. When I clone this repo, I should be able to cd into the codebase, run python -m http.server, and see these pages at the following routes:
- http://localhost:8000/water/water.html
- http://localhost:8000/user/signup.html
- http://localhost:8000/user/profile.html
You: OK, I’ll send you a link to the GitHub repo before the end of the day. We can then touch base whenever it’s convenient for you.
Writing The Code
We have essentially already made our initial plan while meeting with our team. Let’s set up the repository, create the file structure and files, then tackle these three pages one by one.
Go create a repository called cb-client-web. Clone it to your desktop:
  cd ~/Desktop
  git clone https://github.com/<KEVMO>/cb-client-web
  cd cb-client-web
Make the root-level folders and files:
  mkdir user data water
  touch styles.css
Make the user-related files:
  cd user
  touch profile.html signup.html signup.js
Make the water-related files:
  cd ../water
  touch water.html water.js
  cd ../data
  touch water.json
Nowe we have all of the folders and files we need. Let’s build the individual pages.
The Water Sources Page
Let’s start by creating the mock data in the data/water.json file. This is what we think data coming from the API will look like. The array is a collection of our water source data models.
[
    {
        "name": "Silver River",
        "discharge": 810
    },
    {
        "name": "Rainbow River",
        "discharge": 931
    },
    {
        "name": "Ocklawaha River",
        "discharge": 1240
    }
]
Now create the /water/water.html template (also called a view). Make sure it has (1) an ol element with an ID attribute, so you can call it in the JS file, and (2) a script tag importing water.js.
<!doctype html>
<html>
    <head>
        <meta charset="utf-8">
        <meta name="viewport" content="width=device-width, initial-scale=1, shrink-to-fit=no">
        <link rel="stylesheet" href="/styles.css">
        <title>Water Sources</title>
    </head>
    <body id="Water">
        <div class="Title">
            <h1 class="Title_Name">Water Sources</h1>
        </div>
        <div class="Main">
            <ol id="WaterSources"></ol>
        </div>
        <script src="water.js"></script>
    </body>
</html>
Now use the Fetch API to retrieve the JSON, then use the DOM API to stuff that data into the view. Construct this JavaScript pipeline in water.js:
// Makes HTTP request for JSON file
// Then extracts JSON data from HTTP response
// Then calls utility method 1, passing it the data.
fetch("/data/water.json")
    .then(function(response) {
      return response.json();
    })
    .then(function(sources) {
      addSourcesToPage(sources);
    });

// Utility method 1:
// Iterates over water sources array, passing each
// water source object to Utility method 2. Method 2 returns
// `li` DOM nodes, which are then appended to the list we created
// in water.html.
function addSourcesToPage(sources) {
    const list = document.getElementById("WaterSources");

    for (let i = 0 ; i < sources.length; i++ ){
        let li = createListItem(sources[i]);
        list.appendChild(li);
    }
}

// Utility method 2.
// Takes an individual water source objects as an argument
// Returns an `li` DOM node with the data inside.
function createListItem(data) {
  const listItem = document.createElement("li");
  listItem.innerHTML = data.name;

  let paragraph = document.createElement("p");
  paragraph.innerHTML = "Discharge (cubic feet per second): " + data.discharge;

  listItem.appendChild(paragraph);

  return listItem;
}
Test, Iterate, Save
Run python -m http.server and see how the page looks on https://localhost:8000/water/water.html. Fix any bugs you find, then:
git add .
git commit -m "Created water sources page - JS, JSON mock, HTML."
git push origin master
The Sign Up Page
Write the following HTML in signup.html:
<!doctype html>
<html>
  <head>
    <meta charset="utf-8">
    <meta name="viewport" content="width=device-width, initial-scale=1, shrink-to-fit=no">
    <link rel="stylesheet" href="/styles.css">
    <title>CityBucket</title>
  </head>
  <body id="SignUp">
    <div class="Title">
      <h1>CityBucket Sign Up</h1>
    </div>
    <div class="Main">
      <form name="SignUp" class>
        <input name="name" type="text" placeholder="Name">
        <input name="jobTitle" type="text" placeholder="Job Title">
        <button type="submit">Sign Up</button>
      </form>
    </div>
    <script src="signup.js"></script>
  </body>
</html>
Now use JavaScript, document.forms, an event listener, and localStorage to extract and save data from the form. Write the following JavaScript in signup.js
//
// save user info when they submit, then redirect to profile.
//
const signUpForm = document.forms.SignUp;

signUpForm.addEventListener("submit", function(event) {
    // 1. stop the page from refreshing
    event.preventDefault();

    // 2. get the data out  of the form
    const name = signUpForm.elements.name.value;
    const jobTitle = signUpForm.elements.jobTitle.value;

    // 3. Use utility method to save user data
    saveUserToLocalStorage(name, jobTitle);

    // 4. Send the user off to their profile page
    window.location.href = "/user/profile.html";
});


//
// utility method
//
function saveUserToLocalStorage(name, jobTitle) {
    const userJSON = {
        "name": name,
        "jobTitle": jobTitle
    }

    // 1. "Serialize" the data, i.e. convert it into the format
    // your storage layer uses. localStorage will only store strings.
    const userStringified = JSON.stringify(userJSON);

    // 2. Now save the serialized data to localStorage.
    localStorage.setItem("\_cb_user", userStringified);
}
Did you notice the window object? Many Web APIs are attached to it, including document, fetch, and localStorage. The location API exists to access the webpages’s URL, and we used it to redirect the user to our (currently nonexistent) profile page.
Test, Iterate, Save
Run python -m http.server and see how the page looks on https://localhost:8000/user/signup.html. Fix any bugs you find, then:
git add .
git commit -m "Created signup HTML + JS. Save user information to localStorage."
git push origin master
The Profile Page
Add the following to profile.html. Since it’s so little code, we will save the browser some HTTP requests and just include our JavaScript in between the script tags:
<!doctype html>
<html>
  <head>
    <meta charset="utf-8">
    <meta name="viewport" content="width=device-width, initial-scale=1, shrink-to-fit=no">
    <link rel="stylesheet" href="/styles.css">
    <title>CityBucket</title>
  </head>
  <body>
    <div class="Title">
      <h1>CityBucket</h1>
      <h2 id="ProfileName"></h2>
    </div>
    <div class="Main">
      <p id="Profession"></p>
    </div>
    <script>
        // 1. fetch data from local storage with the _cb_user key.
        let user = localStorage.getItem("_cb_user");

        // 2. convert the data to a usable JS object.
        user = JSON.parse(user);

        // 3. Attach the data to the DOM
        const nameNode = document.getElementById("ProfileName");
        nameNode.innerHTML = user.name;

        const professionNode = document.getElementById("Profession");
        professionNode.innerHTML = "Title: " + user.jobTitle;
    </script>
  </body>
</html>
Test, Iterate, Save
Run python -m http.server and see how the page looks on https://localhost:8000/user/profile.html. Fix any bugs you find, then:
git add .
git commit -m "Created profile page. Reads user data from localStorage."
git push origin master
Don’t Forget To Style!
Finally, add the following to styles.css:
* {
    font-family: helvetica, sans-serif;
}

.Title {
    background: #0E57FF;
    color: white;
    text-align: center;
    max-height: 200px;
    line-height: 100px;
    text-transform: uppercase;
}

.Main {
    width: 80vw;
    max-width: 500px;
    margin: 0 auto;
}

#Water li {
    text-transform: uppercase;
}

#Water p {
    text-transform: capitalize;
}

#SignUp input,
#SignUp button {
    display: block;
    height: 3em;
    width: 300px;
    font-size: 1em;
    margin: 0 auto;
    margin-bottom: 1em;
    padding-left: 1em;
}
As always, test, iterate, and deploy.
Recap
You covered a lot of ground in this chapter. You learned how to begin to use multiple Web APIs, including the DOM, Fetch, Web Storage, and Location APIs.
Exercises
x. Web APIs
x. The most important Web API Document Object Model API.
Review MDN’s “Introduction to the DOM” and “DOM Examples”
- https://mdn.io/dom-introduction
- https://mdn.io/dom-examples
If you want to know more about tree data structures, skim Wikipedia.
- https://en.wikipedia.org/wiki/Tree_(data_structure)
Note that the global object for
x. You used the Fetch API to retrieve a JSON document on the Water Sources page.
Review MDN on
- https://mdn.io/using-fetch
x. Web Storage APIs
x. Location API
x. Organizing file structures
x. You just made a template processor. Congratulations.
https://en.wikipedia.org/wiki/Template_processor
